Cluster Management
This section describes the process of deploying a Kubernetes cluster via Astro platform on your AWS, GCP, or Azure account.
Introduction
There are three ways to manage Kubernetes clusters with the Astro platform:
- Self-Hosted K8s Clusters: Vanilla Kubernetes clusters that Astro platform will manage on your behalf.
- Managed K8s Clusters: Kubernetes clusters deployed and managed by Astro platform using the cloud provider's managed service for the control plane.
- Bring Your Own Kubernetes Cluster (BYOC): Existing Kubernetes clusters you bring to the platform. See Bring Your Own Kubernetes Cluster.
More specifically, you can choose between the following cloud providers:
- AWS: Deploy on your own VPC or use the VPC created by Astro on your account.
- GCP: Deploy on your own VPC or use the VPC created by Astro on your account.
- Azure: Deploy on your own VNet or use the VNet created by Astro on your subscription.
Self-Hosted Clusters
This is vanilla kubernetes cluster that astro platform will manage on your behalf.
AWS
This section describes the process of deploying a Kubernetes cluster on your AWS account.
API Specification
Cluster API Specification
clusterName: aws-k8s-dev # name of the cluster
provider: aws # provider of the cluster
region: us-west-2 # region of the cluster
provisioner:
  type: selfHosted # type of the provisioner
  selfHosted:
    accountId: <your-aws-account-id> # your aws account id
    # networkId:  vpc-018f2dec8bb5ddfdd # bring your own VPC
    bucketName: <bucket-name> # bucket name to store the cluster configuration
    credentials: # credentials stored in platform vault via 'astroctl cloud aws selfHosted setup'
      type: vault
clusterSpec:
  dataPlane: # specification of the data plane
    nodeGroups: # specification of the node groups
    - name: test-mg # name of the node group
      minNode: 3 # minimum number of nodes, 3 is good default given we use three availability zones
      maxNode: 6 # maximum number of nodes
      machineTypes: # machine types of the nodes
      - t3.large # machine type of the nodes
      labels: # labels of the nodes
        foo: "bar"
  controlPlane: # specification of the control plane
    nodeGroup:
      name: control-plane
      machineTypes:
      - t3.medium
Make sure to follow the prerequisites before you start.
For more information about the cluster specification, see
- Provisioner Specification
- Cluster Specification - Data Plane
- Cluster Specification - Control Plane
- Notification Configuration
Operations
- 🚀 Applying cluster configurations
- 🛠️ Get cluster details
- 🔑 Manage kubeconfig
- 🚫 Deleting cluster
- 📊 Checking cluster status
- 🔄 Upgrade cluster
GCP
This section describes the process of deploying a Kubernetes cluster on your GCP account.
API Specification
Cluster API Specification
clusterName: foo-cluster # name of the cluster
provider: gcp # provider of the cluster
region: us-west2 # region of the cluster
provisioner:
  type: selfHosted # type of the provisioner
  selfHosted:
    # this is the gcp project id
    accountId: xxxx # your gcp project id
    # networkId:  vpc-018f2dec8bb5ddfdd
    bucketName: <bucket-name> # bucket name to store the cluster configuration
    credentials: # credentials stored in platform vault via 'astroctl cloud gcp selfHosted setup'
      type: vault
clusterSpec:
  dataPlane: # specification of the data plane
    nodeGroups: # specification of the node groups
    - name: test-mg # name of the node group
      minNode: 3 # minimum number of nodes, 3 is good default given we use three availability zones
      maxNode: 6 # maximum number of nodes
      instanceType: spot # ondemand or spot
      machineTypes:
      - e2-medium # machine type of the nodes
      labels: # labels of the nodes
        hello: "test"
  controlPlane: # specification of the control plane
    nodeGroup: # specification of the node group
      name: control-plane # name of the node group
      machineTypes: # machine type of the nodes
      - e2-medium # machine type of the nodes\
For more information about the cluster specification, see
- Provisioner Specification
- Cluster Specification - Data Plane
- Cluster Specification - Control Plane
- Notification Specification
Operations
- 🚀 Applying cluster configurations
- 🛠️ Get cluster details
- 🔑 Manage kubeconfig
- 🚫 Deleting cluster
- 📊 Checking cluster status
- 🔄 Upgrade cluster
Managed Clusters
This is the version of Kubernetes cluster that is deployed and managed by Astro platform but uses the cloud provider's managed service for the control plane.
EKS
This section describes the process of deploying a Kubernetes cluster on your AWS account.
API Specification
Cluster API Specification
clusterName: <cluster-name> # name of the cluster
provider: aws # provider of the cluster
region: us-west-2 # region of the cluster
provisioner:
  type: eks # type of the provisioner
  eks:
    accountId: <your-aws-account-id> # your aws account id
    credentials: # credentials to access the cluster
      type: dynamic # type of the credentials
  # approvalWorkflow is set server-side based on your org role.
  # Org owners provision immediately; admins require owner approval.
  # Do not include this field in your request — it is overridden by the backend.
clusterSpec: # specification of the cluster
  dataPlane: # specification of the data plane
    nodeGroups: # specification of the node groups
    - name: test-node-group
      minNode: 3 # minimum number of nodes, 3 is good default given we use three availability zones
      maxNode: 6 # maximum number of nodes
      machineTypes: # machine types of the nodes
      - t3.medium
      labels: # labels of the nodes
        hello: test
Make sure to follow the prerequisites before you start.
Please refer to the following documents for more information about the cluster specification:
- Provisioner Specification
- Cluster Specification - Data Plane
- Cluster Specification - Control Plane
- Notification Specification
- Approval Workflow
Operations
- 🚀 Applying cluster configurations
- 🛠️ Get cluster details
- 🔑 Manage kubeconfig
- 🗑️ Deleting cluster
- 📊 Checking cluster status
- 🔄 Upgrade cluster
GKE
This section describes the process of deploying a Google Kubernetes Engine (GKE) cluster on your GCP project.
API Specification
Cluster API Specification
apiVersion: platform.astropulse.io/v1
kind: K8sCluster
spec:
  clusterName: my-gke-cluster # name of the cluster
  provider: gcp # provider of the cluster
  region: us-central1 # region of the cluster
  provisioner:
    type: gke # type of the provisioner
    gke:
      projectId: <your-gcp-project-id> # your GCP project id
      credentials: # credentials to access the cluster
        type: dynamic # dynamic credentials
  clusterSpec: # specification of the cluster
    dataPlane: # specification of the data plane
      nodeGroups: # specification of the node groups
      - name: default-pool
        minNode: 1 # minimum number of nodes
        maxNode: 3 # maximum number of nodes
        instanceType: ondemand # ondemand or spot
        machineTypes: # machine types of the nodes
        - e2-medium
        labels: # labels of the nodes
          environment: production
Make sure to follow the prerequisites before you start.
Please refer to the following documents for more information about the cluster specification:
Operations
- 🚀 Applying cluster configurations
- 🛠️ Get cluster details
- 🔑 Manage kubeconfig
- 🗑️ Deleting cluster
- 📊 Checking cluster status
- 🔄 Upgrade cluster
AKS
This section describes the process of deploying an Azure Kubernetes Service (AKS) cluster on your Azure subscription.
API Specification
Cluster API Specification
apiVersion: platform.astropulse.io/v1
kind: K8sCluster
spec:
  clusterName: my-aks-cluster # name of the cluster
  provider: azure # provider of the cluster
  region: eastus # region of the cluster
  provisioner:
    type: aks # type of the provisioner
    aks:
      subscriptionId: <your-azure-subscription-id> # your Azure subscription ID
      resourceGroup: <your-resource-group> # your Azure resource group
      credentials: # credentials to access the cluster
        type: dynamic # dynamic credentials
  clusterSpec: # specification of the cluster
    dataPlane: # specification of the data plane
      nodeGroups: # specification of the node groups
      - name: default-pool
        minNode: 1 # minimum number of nodes
        maxNode: 3 # maximum number of nodes
        instanceType: ondemand # ondemand or spot
        machineTypes: # machine types of the nodes
        - Standard_D2s_v3
        labels: # labels of the nodes
          environment: production
Make sure to follow the prerequisites before you start.
Please refer to the following documents for more information about the cluster specification:
Operations
- 🚀 Applying cluster configurations
- 🛠️ Get cluster details
- 🔑 Manage kubeconfig
- 🗑️ Deleting cluster
- 📊 Checking cluster status
- 🔄 Upgrade cluster
🚀 Cluster Operations
These are the operations that you can perform on the cluster.
Nova can inspect any cluster in plain language — status, connectivity, and AI-powered health diagnostics — whether AstroPulse provisioned it or you registered your own.
For provisioned clusters, Nova can scale node groups for you (it previews the change and applies it only after you confirm) and can analyze an upgrade, update, rollback, or deletion and hand you the exact astroctl command to run, so the irreversible step is always yours.
For registered (bring-your-own) clusters, management runs through your own tooling — Nova can generate the exact astroctl register and unregister commands for you to run.
📈 Apply Cluster Configuration
To apply the updated cluster configuration, execute the following command (admin role required):
astroctl infra k8s apply -f <cluster-config.yaml>
🗑️ Delete Cluster
To delete a cluster, execute the following command (admin role required):
astroctl infra k8s delete <cluster-name>
Ask "what would happen if I delete redis-qa?" and Nova analyzes the blast radius — the applications and workloads that depend on the cluster — then returns the exact delete command. Nova never deletes a cluster itself; you run the command once you have reviewed the impact.
🛠️ Get Cluster Details
To get the details of a cluster, execute the following command (no admin required):
astroctl infra k8s get <cluster-name>
In the console, opening a cluster shows the same information in the detail view — provider and region, Kubernetes version, node and application counts, lifecycle timestamps, and infrastructure summary:
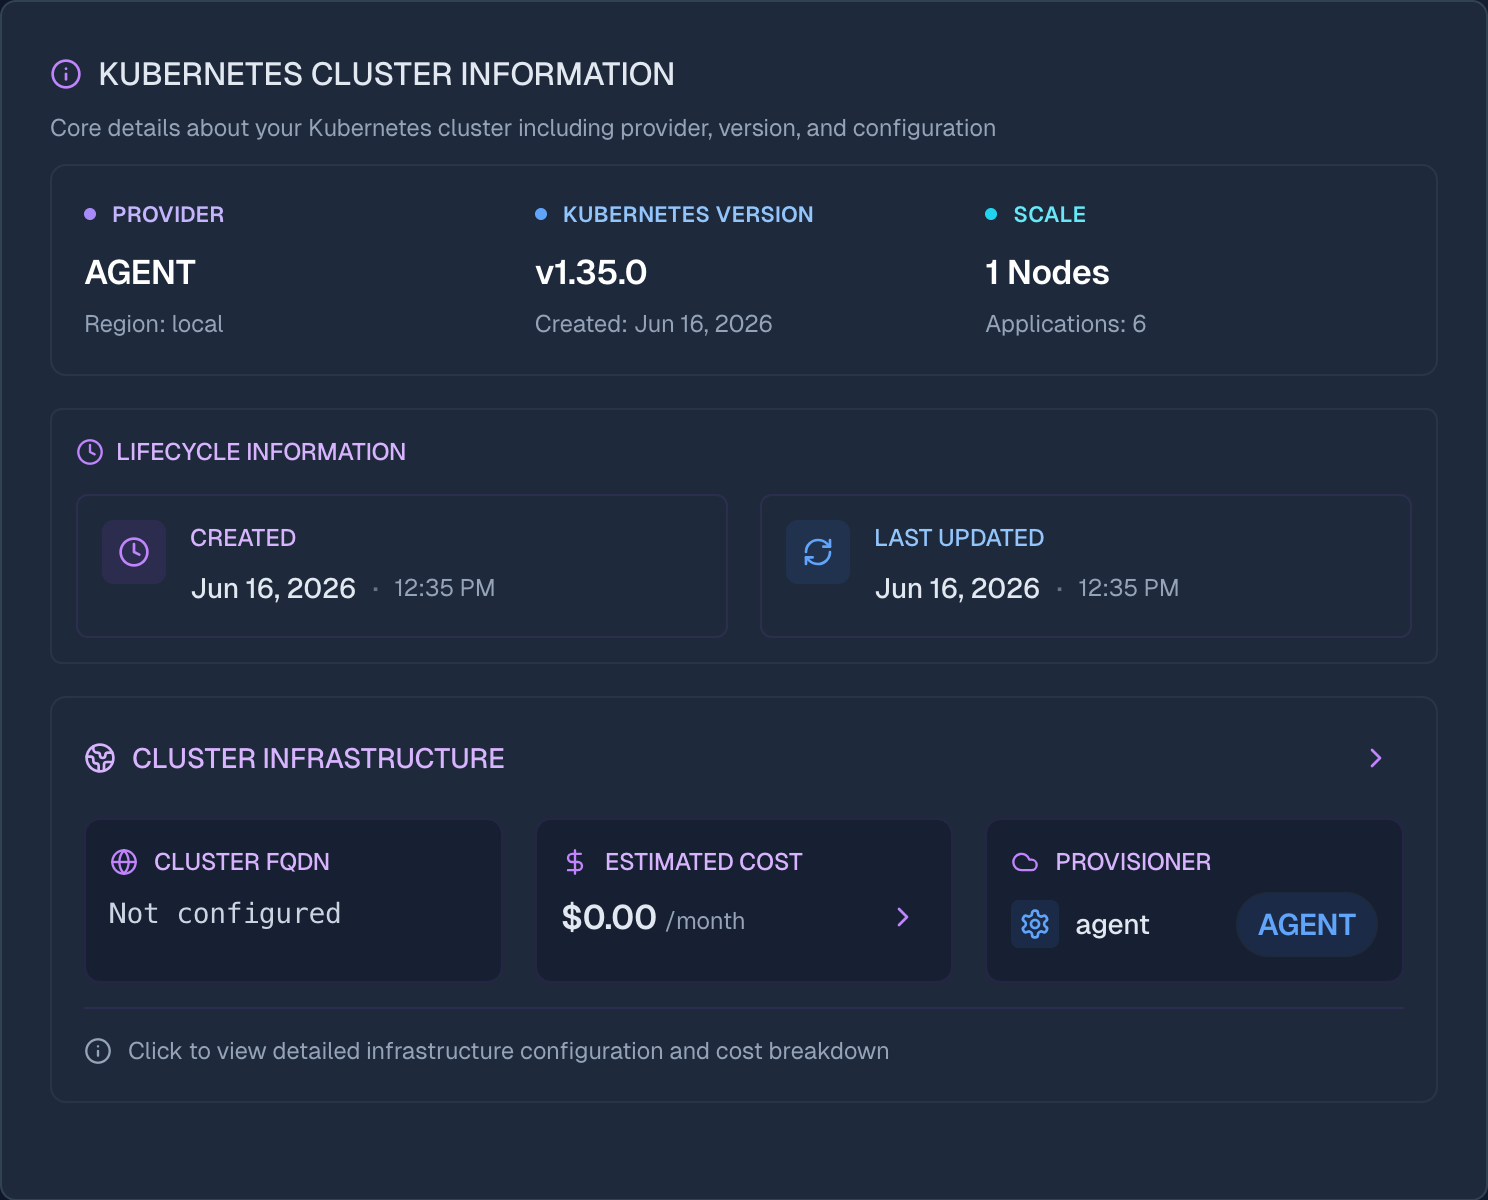
A quick tour of a cluster in the console — connectivity and last-seen, agent connection, status, node groups, and the full Kubernetes cluster information:
🔑 Manage Kubeconfig
To generate the kubeconfig file for a cluster, execute the following command (no admin required):
astroctl infra k8s generate-kubeconfig <cluster-name>
To set the context for a cluster, execute the following command (no admin required):
astroctl infra k8s set-context <cluster-name>
📊 Check Cluster Status
This command will show the status of the cluster.
astroctl infra k8s get <cluster-name>
Note There is no separate status subcommand — use astroctl infra k8s get <cluster-name> to see a cluster's current state. If your cluster is stuck in INPROGRESS, please contact the Astro Platform team for help.
Connectivity & last seen
Beyond a cluster's lifecycle state (provisioning, ready, and so on), the console shows whether the platform can currently reach the cluster and when it was last seen. It appears as a status pill on the cluster's detail page and on each cluster card:
- Connected — the platform can reach and manage the cluster right now.
- Disconnected — the platform cannot currently reach it.
- Unknown — reachability could not be determined.

This signal is independent of lifecycle state and applies to every cluster type, so a cluster that is otherwise "ready" tells you immediately if it has lost contact.
You can also ask Nova in plain language, for example "is redis-qa healthy?" or "which of my clusters are disconnected?"
🔄 Upgrade Cluster
The Astro platform supports Kubernetes version upgrades for all cluster types (EKS, GKE, AKS, and self-hosted). Upgrades follow a phased approach: control plane first, then node groups.
Basic Upgrade
To upgrade a cluster to a new Kubernetes version:
# List available versions first
astroctl infra k8s upgrade <cluster-name> --list-versions

# Upgrade to specific version
astroctl infra k8s upgrade <cluster-name> 1.30
Dry-Run Validation
Before upgrading, validate the upgrade path without making changes:
astroctl infra k8s upgrade <cluster-name> 1.30 --dry-run
Generate Readiness Report
Get a comprehensive readiness report including capacity analysis:
astroctl infra k8s upgrade <cluster-name> 1.30 --generate-report
Understanding Rolling Updates
The --max-surge and --max-unavailable flags control how nodes are upgraded:
| Setting | Description | Capacity Impact |
|---|---|---|
| --max-surge | Extra nodes created DURING upgrade | Requires additional capacity |
| --max-unavailable | Nodes that can be DOWN during upgrade | Reduces cluster capacity temporarily |
Example with Multiple Node Groups:
Cluster: my-production-cluster
├── ng-system:   3 nodes (critical)     → maxSurge=1, maxUnavailable=0
├── ng-app:      10 nodes (general)     → maxSurge=2, maxUnavailable=1
└── ng-workers:  20 nodes (batch)       → maxSurge=10%, maxUnavailable=10%

UPGRADE PROCESS (each node group upgraded sequentially):
1. ng-system:  Creates 1 extra node, drains old → needs 4 nodes temporarily
2. ng-app:     Creates 2 extra, drains 3 at a time → needs 12 nodes temporarily
3. ng-workers: Creates 2 extra (10%), drains 2 → needs 22 nodes temporarily

TOTAL CAPACITY NEEDED: max(4, 12, 22) = 22 nodes at peak
Recommended Upgrade Strategies
PRODUCTION (Default - Zero Downtime):
# Creates 1 extra node per group, needs N+1 capacity
astroctl infra k8s upgrade <cluster-name> 1.30 --max-surge 1 --max-unavailable 0
COST-SENSITIVE (No Extra Capacity Needed):
# Upgrades in-place, one node at a time, slower but no extra cost
astroctl infra k8s upgrade <cluster-name> 1.30 --max-surge 0 --max-unavailable 1
FAST UPGRADE (More Parallelism):
# Creates 25% extra nodes, faster but needs more capacity
astroctl infra k8s upgrade <cluster-name> 1.30 --max-surge 25% --max-unavailable 0
Upgrade from YAML File
For complex updates, use a YAML configuration:
kubernetesVersion: "1.30"

rollingUpdate:
  maxUnavailable: "1"
  maxSurge: "1"

nodeGroups:
  - name: "default-pool"
    minNode: 2
    maxNode: 8
    machineTypes: ["t3.medium"]  # or ["e2-medium"] for GKE, ["Standard_D2s_v3"] for AKS
    labels:
      workload: "general"
Apply the update:
astroctl infra k8s update <cluster-name> -f upgrade.yaml
Upgrade Workflow Phases
- Pre-flight Validation: Version validation, cluster health check, addon compatibility, capacity analysis
- Control Plane Upgrade: Cloud provider managed upgrade (EKS/GKE/AKS) or self-hosted control plane update
- Node Group Upgrade: Rolling update of nodes with configurable surge and unavailability
- Addon Updates: Update managed addons to compatible versions
- Post-Upgrade Verification: Verify all nodes at target version and healthy
- Sequential upgrades only: Cannot skip minor versions (e.g., 1.28 to 1.30 is invalid)
- Control plane cannot be downgraded: Only node groups can be rolled back
- Test in non-production first: Always validate upgrades in a test environment
- Check capacity: Ensure your cloud account has quota for surge nodes
Provider-Specific Behavior
| Provider | Control Plane | Node Groups | Rollback |
|---|---|---|---|
| EKS | AWS managed | Rolling update with surge | Node groups only |
| GKE | GCP managed | Sequential node pool upgrades | Node pools only |
| AKS | Azure managed | Rolling agent pool upgrades | Agent pools only |
| Self-Hosted | Managed rolling update | Rolling update with drain | With --allow-downgrade |
Track upgrade progress in real-time:
astroctl infra k8s progress stream <cluster-name>
For provisioned clusters, ask "what versions can prod-eks upgrade to?" or "is prod-eks ready for 1.30?" — Nova lists the available versions, generates a readiness and capacity report, and returns the exact upgrade command for you to run. Because Kubernetes upgrades are irreversible, Nova analyzes and recommends but never runs the upgrade itself.
Need more capacity instead of a version bump? Ask "scale the ng-app node group to a max of 12 nodes" — Nova previews the change and applies it after you confirm.